Bagger GUI User Guide
The Bagger application is a critical component in the State Archives management of the North Carolina Digital Repository. The free application, developed for the Library of Congress, allows the user to
- Create a “digital fingerprint,” or checksum for each digital file
- Verify the files are unchanged
- Confirm the chain of custody
- Support the archives’ preservation action
Bagger Use with Digital Transfers
Verifiable data transfer is a critical component of the State Archives’ work in the preservation of permanent digital public records. When state agencies transfer digital records to the archives for preservation, the agency prepares the transfer using Bagger. Local Agencies transferring materials to the State Archives for microfilming will also use Bagger. In both cases, the archives uses Bagger to verify that the files arrived intact and unchanged, confirming the chain of custody.
Bagger Installation
Important Considerations Before You Begin
Before you begin the file-bagging process, please contact the Records Management Analyst for your agency to confirm the records are eligible for transfer. The records analyst will also ensure you have the most up-to-date transfer form to accompany the materials.
Directory of Records Management Analysts for State Agencies
Directory of Records Management Analysts for Local Government Agencies
Special Note on Non-Windows Operating Systems
These instructions target a Windows operating system. If materials originate on a Mac OS computer or computer running another non-Windows operating system, please contact the Records Management Analyst for your institution for further assistance.
Special Note on Administrator Rights
The “Downloading and Installing Bagger” section of this manual requires that the user has “administrative rights” which allow them to download and install software on the machine they are working on. For agencies working within the North Carolina Department of Information Technology tenant, that is usually not the case. If you are working within the DIT network, you will need to contact your department’s IT or put in ticket via NC DIT Service Portal for assistance installing Bagger.
Downloading and Installing Bagger
As noted above, only users who have administrative rights on their machine will be able to install Bagger themselves. If you are prompted for admin credentials and are thus unable to install Bagger, contact your IT support team.
Download Files from GitHub
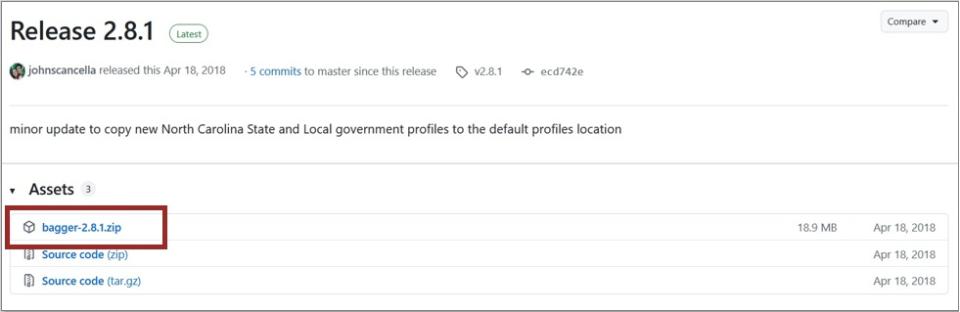
Visit the Library of Congress Bagger GitHub page to learn more about the tool and to download the most recent version. Click on the bagger-2.8.1.zip highlighted in the image below:
The download will begin and show up in your downloads bar. You can save the zip file wherever you like but note the location. Your computer will likely automatically save it in a download folder.
Extract Zipped Files
You can use the Windows default zip reader to extract the zip file. You may also choose to use 7-Zip or another file archiver tool to carry out the next step.
To extract the zipped files, navigate to the downloaded bagger-2.8.1.zip file
- Right click and select "Extract all...."
- Choose a destination folder, such as your C: drive or Desktop.
- Click "Extract"
How to Create a Bag
Open Bagger
Navigate to where you have saved the unzipped folder bagger-2.8.1. Open the bin folder, and double click on the Windows Batch File (it may appear as bagger.bat)

When Bagger is opened, you will see a black terminal window behind the Bagger interface:
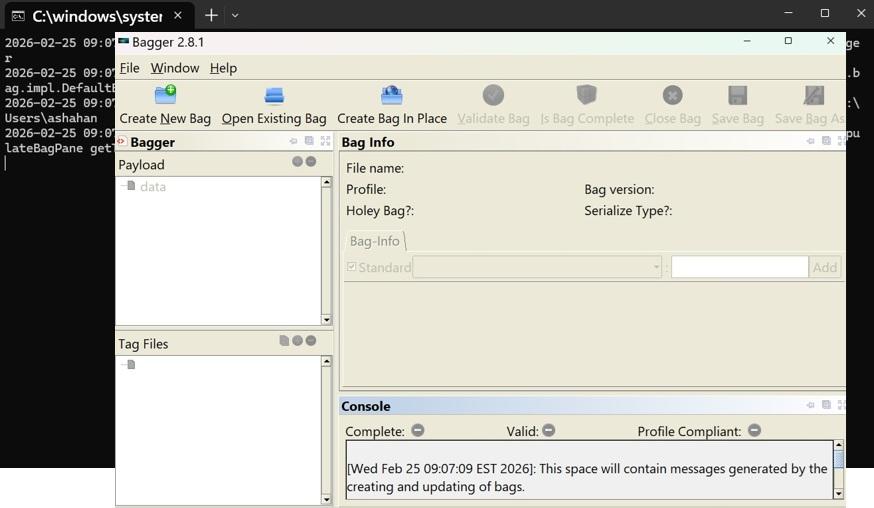
You can ignore the black window and work exclusively in the user interface.
Note: When opening Bagger, if you receive an error message in the black terminal window related to Java, please find next steps in the section, "Resolving a Java Error."
Setting Up a New Bag
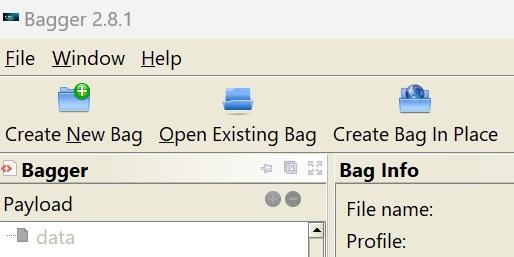
On the main screen of the Bagger application, click "Create New Bag."
A small dialog box will open and prompt you to select a profile from the dropdown menu. If you do not see the dropdown options, try enlarging the New Bag Dialog window.
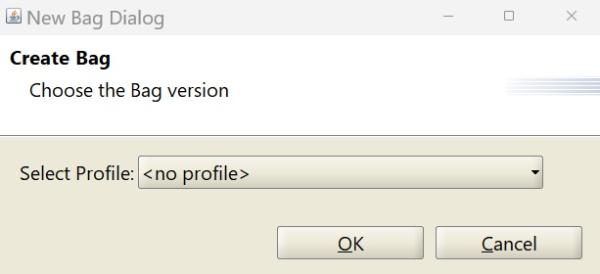
- State agencies will select "SANC-state" from the dropdown options
- Local government agencies and municipalities will select "SANC-local"
- Click "OK" when the profile is selected
A Bag-Info pane will appear on the right side of the interface shows a list of details the user will need to fill out. Fields marked with a red “R” are required. Some are dropdown options and in others, the users will enter data.
Local agencies will be required to supply information for these fields:
- Record Series Title
- Transferring County Name
- Creating Agency Name
- Transferring Employee
- Receiving Institution
- Receiving Institution Address
- Dates of Records
- Digital Originality (Are the records original/born digital?)
- Classification for Access (Are the records Open/Public; Contains some confidential records; etc.)
- Digital Content Structure (What file formats are included? If there are multiple file formats, select “Compound”)
State agencies will be required to supply information for these fields:
- Item Number
- RC Number
- Transferring Employee
- Receiving Institution
- Receiving Institution Address
- Dates of Records
- Digital Originality (Are the records original/born digital?)
- Classification for Access (Are the records Open/Public; Contains some confidential records; etc.)
- Digital Content Structure (What file formats are included? If there are multiple file formats, select “Compound”)
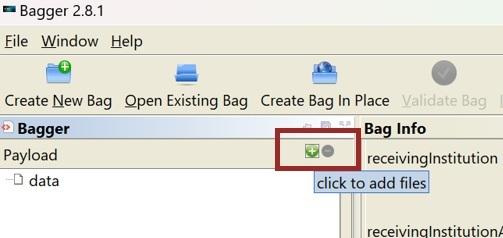
Adding “Payload” to Bag
There are no files save to your bag yet. You can add folders and/or individual files (i.e., what Bagger calls the “payload”), two different ways:
- Navigate to main navigation and select File, Add Data, or
- Click the green data button seen here:
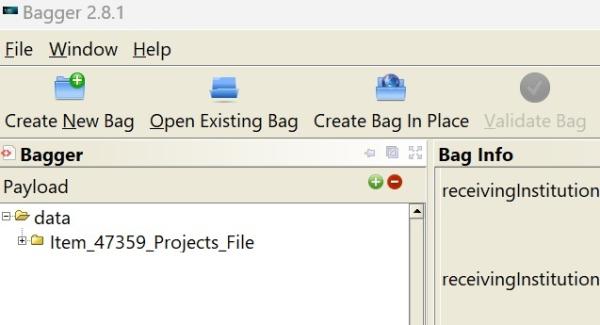
A new dialog box will prompt you to select the materials you would like to be bagged. You may select as many folders as you like from as many places as you like. Select the "Open" button to assign your selections to the bag.
Note: When you click "Open," nothing happens to the actual files. You are simply preparing a list, and you may still add and remove files freely at this stage. You are not committing yourself to anything.
New files will appear in the Payload section on the left:
Save the Bag
Start by clicking on the "Save Bag As…” button
- Verify the tag manifest and payload manifest boxes are checked
- Verify the Tag Manifest Algorithm dropdown is set to sha256
- Verify the Payload Manifest Algorithm dropdown is set to sha256
- Click the Browse button and navigate to the desired location on your device.
Note: Please use the "Browse" button to navigate to the correct location and then type in the bag name, rather than typing the path into the save field, as Bagger will encounter an error and be unable to save the bag.
In the File Name box, type in a name for the bag you prepared. Follow these rules when naming a bag:
- Always end the bag name with _bag
- For State Agencies, begin the bag name with the item number of the transfer
- For Local Agencies, begin the bag name with the record type (Minutes_bag; Maps_bag)
- If the bag contains confidential information, include the word CONFIDENTIAL in the name.
- Replace all empty spaces with underscores (Easley_Exec_Orders instead of Easley Exec Orders)
- Include the date the bag was made (today’s date)
- Make the name of the bag meaningful, so you could discern the nature of its contents without having to open it
Example bag name: 3989_lankford_documents_20120214_bag
Click "OK" to begin processing the bag save. The save process can take some time, during which Bagger
- Generates checksums of the original files, creating a “digital fingerprint” of each file.
- Copies the files to the bag location the user indicated.
Note: After clicking "OK," if you hover your cursor over Bagger, the cursor will appear busy. This will continue until Bagger has finished checksumming the files. Once Bagger begins to copy the files, a progress bar will appear, and the cursor will return to normal.
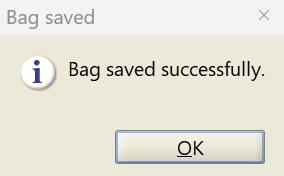
Once the bag has been saved, a popup window will appear:
Record the Size of the Saved Bag
Use details from the Bag Info panel to complete the digital transfer form:
- Note the "Bag-Size"
- Record the number of files in the bag’s payload, which can be found in Bagger in the numerals after the period in the “Payload-Oxum.”
For example, if the Payload-Oxum was 35285.3. There were 3 files in the bag.
Validate the Bag
To confirm the transfer preparation is complete validate the bag. Select "Validate bag." Once the validation is complete, a popup window will appear that says “Validation successful.” Click "OK"
If you are returning to Bagger in a new session, select "Open Existing Bag"
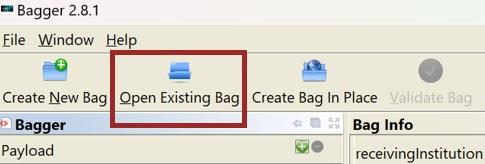
- Navigate to the bag to validate
- Depending on how much data is in the bag, it may take Bagger some time to load.
- Once the metadata profile and bag data has loaded on the screen, click “Validate bag”
Note: Once validation is successful, you have prepared your files for transfer and should not open or alter the validated bag.
Close Bagger
After validating the bag, you can close Bagger by selecting the “Close Bag” button or the small "X" in the top right corner. If Bagger asks if you would like to save the bag, click “No.” (You have just finished saving the bag and do not need to save it again.)
Bagger requires that Java Runtime Environment (JRE) is installed and accessible to Bagger. JRE is widely used, and most computers will already have a copy. You will receive an error when you open Bagger if your computer
- does not have a copy or
- the computer cannot correctly locate its copy
Note: Resolution of this error message requires that the user has “administrative rights.” If you are working within the DIT network, you will need to contact your department’s IT or put in ticket via NC DIT Service Portal for assistance installing Bagger.
If you are not sure if you have administrator rights, try the following steps and stop if you receive a message indicating that you need administrator rights to proceed.
You can check your computer to see if you have a JRE installed by navigating to the Control Panel.
- Type “Control Panel” in the search bar, then click "Open"
- Click “Programs”
- Click "Java"
- Select the Java tab to view the screen that shows the Java Runtime Environment Settings.
- Select the "View..." button, and this will display the Java Runtime Versions you have installed and where they are located.
If Java Runtime is present, note it's location and scroll down to the section, "Configure the Java Runtime Environment Variable."
Otherwise, you will need to download and install JRE from Oracle. Select Windows Offline as shown below:

Navigate to the Windows search bar and type “Advanced System Settings.”
- Click open when you see "View advanced system settings"
- Select "Environmental Variables"
When the Environmental Variables window appears, confirm that the JAVA_HOME environment variable is not defined.The environment variables are listed alphabetically, so you can scroll down the list until you see where the environment variables would be listed that start with J.
- If there is no JAVA_HOME variable listed in the display, it is not yet defined.
Create JAVA_HOME Variable
In the Environment Variables window, Click the "New" button under System Variables table.
- A new "Edit System Variable" window will appear.
- In the Variable name field, type JAVA_HOME.
In the Variable value field, enter the complete path to the folder that contains the JAVA bin folder, the lib folder, and the copyright file.
Note: This will not be the bin folder, but the folder up one level
- Click "OK" to close the Environment Variables window.
- Click "OK" to close the System Properties window.